The OSMC operating system is ideal for turning your Raspberry Pi into a genuine media center. Installing the software is extremely easy, as a setup wizard supports you throughout the setup process. We'll show you all the steps from installation to personalization in this practical tip.
Download OSMC and transfer it to the Raspberry Pi
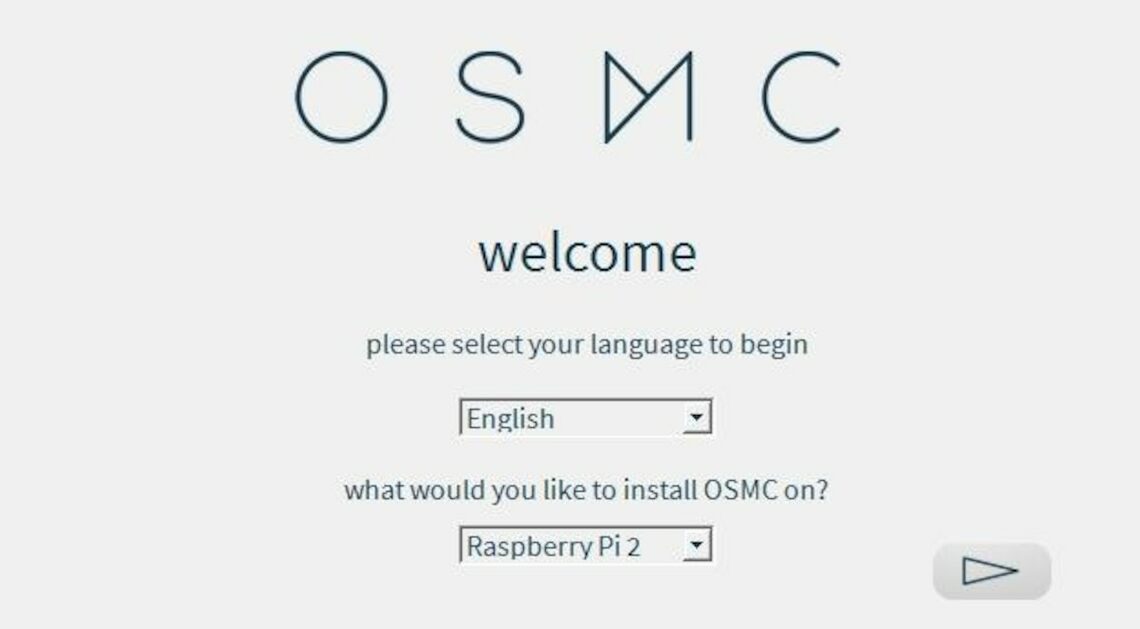
To get OSMC onto the Raspberry Pi, the developer provides its own installer. In our picture gallery you will find the individual steps described in more detail.
- Download the OSMC installer for your system (Windows, OS X or Linux) from us.
- Then run the installer on your computer.
- On the welcome screen, select a language and the version of your Raspberry Pi (1 or 2). The language you select here can be changed later when setting up the Raspberry Pi.
- On the next screen, select the OSMC version you want to install on your Raspberry Pi. You can ignore the item “use a local build on my computer”.
- A micro SD card acts as the hard drive in the Raspberry Pi. Therefore, leave the entry “on an SD card” selected.
- In the next step, you specify how the Raspberry Pi will connect to the Internet. If you specify “wireless connection”, you must enter the name of your network (SSID) and the key.
- If you haven't already, now is the time to insert your Micro SD card into your computer.
- In the next step, accept the end user license. The installer will then start transferring OSMC to your SD card.
Setting up OSMC on the Raspberry Pi
The setup is also guided and you can activate or deactivate all kinds of functions.
- To do this, insert the SD card into the Raspberry Pi, connect it to the screen, keyboard and mouse and boot it up.
- First, OSMC asks you which design you want to use. The new one looks great, of course, but it also requires a bit more resources. If you equip a Raspberry Pi 1 with OSMC, we therefore recommend the older design.
- Then set the correct time, language and region.
- You can also use your smartphone as a remote control for the Raspberry Pi if it is connected to a network. To do this, you need the smartphone app “Kore”, which is available for free in the Play Store.
- Under OSMC you will find the IP address of your Raspberry Pi in the settings, which you must enter into the Kore app.
- If you want your Raspberry Pi to run a little faster, you can tune it a little under “My OSMC”. Select the preconfigured setting “Fast” here.
- The Raspberry Pi can also be filled with a number of programs such as YouTube or the DMAX video library. You can download these via the “Addon Manager”.
- If you want to contact the Raspberry via SSH, you can do so using the command “ssh osmc@osmc” with the password “osmc”.
Video-Tipp: Raspberry Pi 2 im Unboxing
This article refers to OSMC 2015.11-1 and the Raspberry Pi Model 2. The coolest smart home projects for Raspberry Pi can be found in the next article.